
 Part 1: Cleaning objective and preparation
Introduction
This guide is especially meant for the amateur microscopist, who wants and must clean his objective by himself. Use of a water immersion objective requires frequent maintenance and cleaning. This topic is not only about cleaning the optics, but also create a clean microscopic (water) preparation. Any scientific institute has its own guidelines for the trained personal how to use and clean microscope optics. For use in such scientific laboratories, therefore, this guide is meant to provide orientation, only. Ask your local administration for expected use of the microscope, instead.
Overview about all parts of this series:
- Part 1: Cleaning optics
- Part 2: Sample preparation
- Part 3: High resolution images with oblique illumination (in preparation)
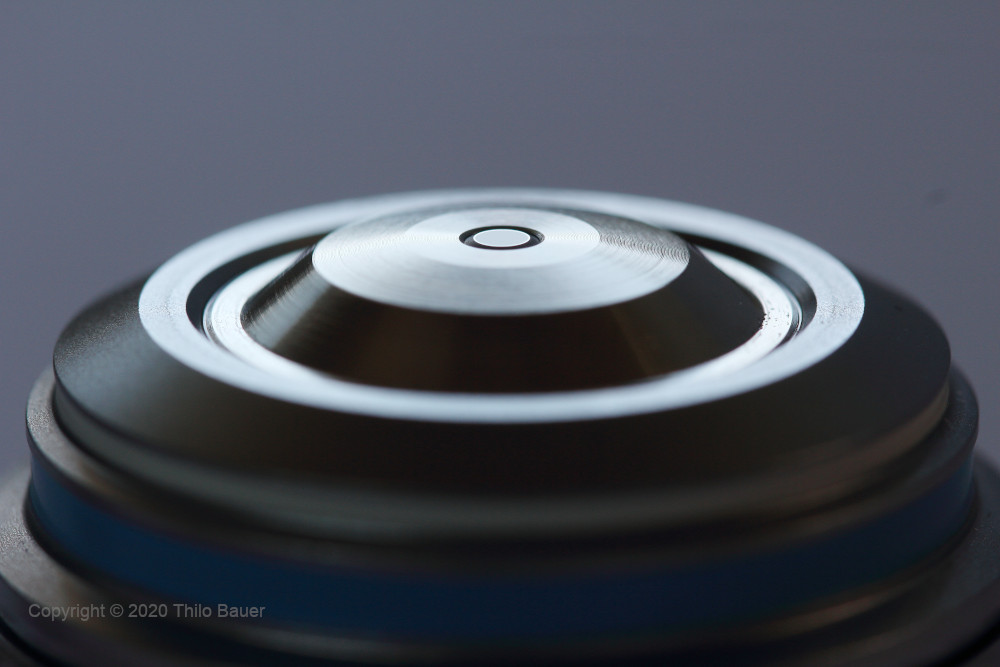
Figure: Front lens of a modern water immersion objective of type Zeiss C-Apochromat 40x/1,2 W Corr. To check for pollution, one uses a magnifying lens looking under flat angle towards a diffuse light source, like an open window. The lens then is evenly illuminated, showing dust and pollution as shadows and films on top of the mount and lens of the objective. A perfectly managed objective, looks clean BEFORE and AFTER observation, as presented in this picture.
What is a Water Immersion Objective?
Water immersion objectives are a special design of microscope objectives, optimized to observe samples within aqueous media. Such samples range from plankton samples, cell cultures, or specimen of mikrotome plant cuts or fungus in water preparation. With this kind of preparation using aqueous medium an optical problem occurs with dry or oil immersion objectives: Spherical aberration. Because the diffractive index of an air gap or oil gap between the objective and specimen slide is different from water, light rays are refracted differently in both, the gap and the medium of the preparation. With increasing depth in the observed preparation the image becomes more and more diffuse and less sharp using a dry objective or oil immersion objective. Consequences are loss of contrast and color correction. This problem was first circumvented by the genius Hartnack, who created a special type of microscope objective in the middle of the 19th century. This type of objective uses water between the front lens and cover slide. This brilliant idea leads to straight light paths from the objective to the object of interest and thus avoids the optical error. Independent from the depth of focal plane in the sample, contrast and color correction remain the same and results in a clean, sharp image along the available working distance of the water immersion objective.
This type of objective nowadays is typically found with research microscopes in life cell imaging. Confocal microscopy and super-resolution microscopy are special use cases, that require best available optics. Interestingly, protozoology was not a domain of the water immersion objective. Despite its strong capabilities, recent literature still recommends the use of an oil-immersion objective for best resolution and image quality. This is misleading, however, and almost always comes with any remark, that oil immersion objectives will yield good results close to the lower cover slide plane, only. Although this type of objectives were originally developed for observations of protists, use of water immersion later was not very common in this area for larger time. Modern water immersion objectives not only are best for the aforementioned use cases in special microscopic disciplines. Given their excellent optical performance, they are the best available tool for water samples. They yield best contrast and color correction for general use in photomicrography of water samples. This is why some amateur microscopists, that I'm aware of, use water immersion objectives for photomicrography of plankton specimen.
Kinds of pollution
Microscopic water immersion objectives suffer from common problems, like other objectives do. But pollution is unique in some way. This is caused by the way how a water immersion objective is applied: Using a water drop between the front lens and preparation.
Microplastics and other dust particles are annoying. Electrostatic forces support adherence of dust on surfaces of all kind. Especially on lens surfaces of a microscope, dust particles will harm optical performance. Diffraction fringes and shadows may occur in the optical path of the microscope. A single small dust grain may degrade image quality heavily. Located at the front lens they may not become directly visible, but may lead to fuzzy images.
A general source of failure may result from dust particles located on the cover slide. A drop of water can draw any dust particle while moving the preparation and the dust remains in the optical path. Especially in fluorescence microscopy this is an annoying source of illumination. Microplastics, cotton or cellulose located in front of the lens will yield a very bright and colorful fluorescent background, especially, if the particles are stained with optical brighteners from textile and clothing industry.
Pollution may also be the result of biological contamination. From fingerprints, danders to biofilms, these are often found at the front of the lens of a water immersion objective.
Types of immersion optics
Certain water immersion objectives will be used dipped in the preparation without a cover slide. These objectives typically are used for special examination of cell cultures. Modern life-cell imaging water immersion objectives, that provide high performance imaging, like the Zeiss LCI Plan-Neofluars, LCI Plan-Apochromat or C-Apochromat are specially designed for use with a cover slide. A correction collar allow for adjustment to different thickness of the cover slide or select the immersion medium (water or glycerol) to match the sample medium. These are the modern predecessors of the original objectives created by Hartnack. These objectives are best suited to observe plankton specimen with best results in image quality and contrast.
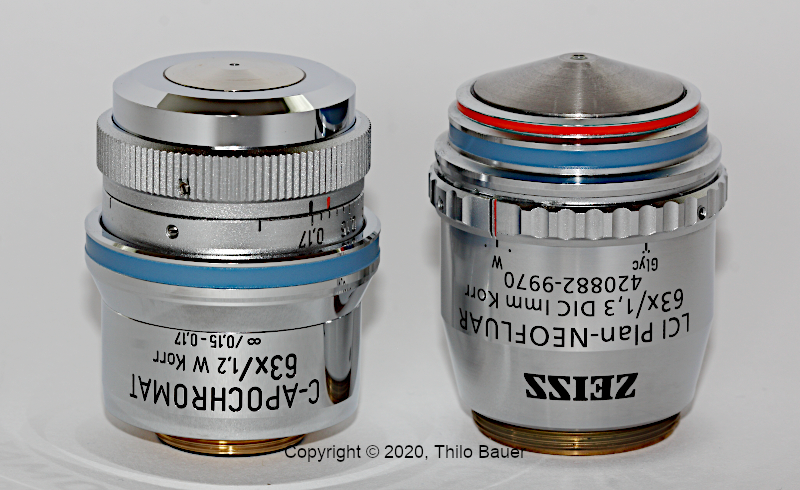
Figure: Two modern water immersion objectives coming with correction collar. Using the correction collar different thickness of the cover slide can be adjusted. Also these objectives have different marks to compensate for different environmental or specimen temperature. A black marks means a temperature of 23°C, while red means 37 °C. The latter temperature range is typical for cell cultures of mammals.
When observing with a water immersion objective, immersion of the objective with a drop of water is a must. Without the water drop these objectives will not yield any sharp image. Instead, expecting to find a sharp focal plane, there is danger to drive the objective into the cover slide. This will eventually result in irreversible damage of the objective! Therefore, do not forget to put a drop of water between objective and preparation. Always use proper immersion solution for water immersion from the manufacturer, like Immersol W. Alternatively distilled or demineralized water can be used, as well. Demineralized water can be bought at supermarkets or scientific suppliers. Alternatively, aquarium shops provide special filters to produce demineralized water at home.
Moving the water immersion objective towards the border of the cover slide will eventually create a bridge of water between the immersion drop and sample medium. Small organisms are now able to take this path to swim between the objective and cover slide in the immersion drop. Eventually, one notices this, if organisms start to swim fast into one direction, or suddenly find a sharp image of any specimen while moving the objective away from the cover slide. Specimen or bacteria taking this path will often result in biofilms polluting the front lens of the water immersion objective.
General recommendation
Organic material, cells, biofilms and salty medium will leave pollution at the water immersion objective. When proteins, cytoplasm, bacteria and other substances of biofilms are dried on surfaces, they will leave pollution, that is harder to remove. If you love cooking, think of a forgotten pot in your kitchen over days and how difficult it will be, to clean the pot afterwards. Therefore, it shall be avoided to let the immersion drop dry on the water immersion objective. Hence, cleaning the surface of the water immersion objective at the end of the session is important.
Inspection of a water immersion objektive
I start my observation removing my water immersion objectives from the turret. Then I use a magnifying glass 10-12x to look for any pollution and necessity of cleaning. Instead of using a magnifying glass, one may as well use an eye piece, looking through it in reversed direction, to inspect the front lens of the water immersion objective.
Take care while removing the water immersion objective from the turret! Always put your second hand below the objective to avoid a fallen objective on the specimen holder of your microscope! Hard knock on the table may cause irreversible damage. Sometimes people tend to be amused and ask me, why I always use nitrile gloves while using my microscope. This is why: One hand is always below the objective when removing it from the microscope for cleaning and to avoid fingerprints on lens surfaces. Fingerprints and biofilms, once dried may cause permanent damage on surfaces like this if they are allowed to stay for longer time.
Having the objective at hand, hold it with front lens upside down (see first figure in this article). Look towards a diffuse light source like an open window. The front lens will now appear evenly illuminated. Any dust particles, biofilms or other residuals will now become easily visible. Now we want to see, if it is real pollution, or not. Often a thought dust particle may appear from light reflection. Carefully rotate the objective between your fingertips to see, if the seen "dust particle" will move and rotate the same you rotate the objective. If the seen shadow rotates the same, it is pollution. If the orientation of the shadow will not change, eventually just move, while you rotate the objective between your fingertips, it is more likely to have found a light reflection. This simple "rotation test" will yield clarification about a real pollution and I find it a very valuable test.
Dry pollution
Larger dust particles or fluff are easily seen using a magnifying glass. Microplastics, cotton or cellulose is common. These particles just adhere from electrostatic forces. They can be easily removed using a fine and clean paint brush. Sometimes one has to repeat this procedure to remove adhesive particles like this. Periodically also check the back lens of your objective, if any dust particles are present and use the clean paintbrush to remove particles found.
Cleaning with tissues
The easiest procedure is moisture cleaning by breathing against the front lens of the water immersion objective to form a coat of condensation and use a clean tissue to immediately remove created moisture together with any dust and biofilms. I heard some amateur microscopists to practice to use spit to clean optics. They claim, that spit shall contain special enzymes and solvents, that support cleaning from pollution. Really, I do not recommend this practice. Purpose of cleaning a water immersion objective is removal of any adherent biofilm, but not add another biofilm to increase pollution.
Remaining water from observation with the water immersion objective can easily be removed by using a dry tissue. Always remove the immersion drop to clean the objective between preparations and avoid contamination with specimen from one preparation to another. To clean the objective, rotate the turret aside, and/or move the specimen table away from the objective, so that the front can easily be reached by your finger. Pull a dry cleaning tissue around your fingertip and clean the lens with your fingertip without pressure. The objective is ready for another preparation!
I prefer cleaning with tissues, because it is fast and efficient. Some people recommend a clean cotton tissue, that has been washed multiple times. I find it more practical to use tissue from kitchen roll. One does not need a full tissue to clean a small surface. Just cut it into handy pieces, just large enough to pull it over your fingertip. This is most efficient to use this kind of tissue, that cannot be recycled. Hard paper or optical cleaning paper shall not be used to clean microscope optics. Especially from the latter wet cleaning papers I found remaining films from cleaning solutions, that require additional cleaning by other cleaning techniques. From this observation such cleaning papers are useless.
Avoid brute force while cleaning the front lens with a tissue! Use little pressure to clean sensitive optical surfaces. Pull a tissue around your finger tip. Then slightly press the front lens of the water immersion objective into the tissue while rotating the objective half way around its axis. Congratulations, you just managed one complete step of cleaning. Now check with your magnifying glass again.
I personally use the procedures described in this article for many years now. None of the objectives has been damaged from cleaning. Water immersion objectives are constructed in a way to be used with water. Hence, they are constructed tight and robust, because it is well known, that they require cleaning often after observation.
If you are uncertain how to remove heavy pollution, use an old objective, that is already damaged or otherwise not very valuable to train procedures. Put its front lens a millimeter into the surface a plankton sample and wait few days for the biofilm to dry. Then try out and train the following cleaning steps, especially the "full washing program".
Next steps described in this articles are "wet cleaning" and a "full washing program". Wet cleaning is required, if any adherent material cannot be removed by breathing on the surface and cleaning with a dry tissue. The "full washing program" is required, if nothing helps tried before, the water immersion objective contains dried biofilms or similar, that stayed there for larger periods.
Wet cleaning
As already pointed out, cells and bacteria really like to move towards the objective using water immersion objectives, especially if the objective scans the preparation at the borders of the cover slide. Hence, the objective shall always be inspected and cleaned, if you finished microscopic observation.
If you find milky films, dried biofilms or other pollution, that are not easy to remove, we can use a trick from cell biology. In order to destroy cell pellicles and organelle membranes and solve biological material, detergents can be used, like Triton X-100. A simple dishwashing detergent from the supermarket will work as well, as it contains very similar detergents. Avoid dishwashing solutions that contain skin care products, because they may leave oil films after cleaning. Pull a kitchen tissue around your finger, then put a small drop of the dishwashing cleaning solution or detergent on the tissue, breathe on the surface of the objective and move it rotating into the tissue, as described above. If cleaning in this manner does not help, solve one drop of the cleaning solution in 10 milliliters of water. Pull tissue around fingertip, put it into solution to get wet, then carefully smear the solution over the front lens. Wait another 10-30 seconds, then use a dry tissue to remove the solution from the objective. Now, clean the water immersion objective using demineralized water 2-3 times, then use a dry tissue to dry the front lens. Inspect using a magnifying glass to check for pollution again. Many kinds of pollutions will be removed in this manner.
Sterilization
From observing ciliate species using DNA staining with Hoechst dyes and fluorescence microscopy, I sometimes found individuals with bright blue fluorescence from cytoplasmic staining. As Hoechst dyes are very specific to DNA, the most likely interpretation of this effect is any infection with a virus. This is confirmed by uncounted publication records about infections of protists with bacteria and viruses, common diseases to ciliates and other protists, as well.
To sterilize the microscope use ethanol 70% or isopropanol 70%, which is cheaper. Nitrile gloves are recommended. Pull a dry tissue around the fingertip, then put few drops of the alcoholic solution onto the tissue, breathe on to the front lens (repetition is always good to remember). Immediately, put the objective into the alcoholic tissue while rotating it for a couple of seconds. If sterilization is important, one shall consider sterilization of the stage, focussing knobs and other parts, that are likely contaminated during observation of your sample.
Full washing program
"Oh ..., I forgot to clean my microscope last time!" Days or weeks after the last observation biofilms are found to remarkable degrade image quality. Pollutions tends not to be removed by easy procedures described above. It's time for the "full washing program".
Prepare a solution of detergent as described above (one drop at 10 ml water). Pull tissue around fingertip and put it into solution. Moisten front lens for 30-60 seconds rotating the water immersion objective to solve dried biofilm. Use new tissue to clean the objective with distilled water 2-3 times rotating the objective. Use new tissue with a drop of isopropanol 99% to clean in the same manner. Avoid denatured ethanol mixtures, as additives in denatured ethanol may leave films after cleaning. Use new tissue with a drop of petroleum ether, then clean objective again rotating in tissue. In the next step, use isopropanol again to clean the objective. This step is eventually important to remove residuals from petrol ether. Again, breath on objective and use a dry tissue to clean. Now inspect using a magnifying glass. Wait until remaining fluids are gone. The objective should now be clean, eventually dust particles are seen. If the objective is not yet clean, and biofilms still remain, then repeat this procedure once again starting with the dishwashing detergent. A second cleaning approach with full washing programm is usually enough in very hard cases.
Use of cotton wool
Some manufacturers recommend use of cotton wool bound on a wooden tip to clean microscopic optics. Personally, I was never convinced using this method. Fluff from the cotton wool is hard to handle, tends to remain getting stuck on metallic egdes, hard to remove, or fluff seems to return again and again after removal. This lengthy cleaning procedure appears much more inefficient for daily use in microscopic routine observation with a water immersion objective. There is one exception, if one needs to clean the back lens of any objective that is located deeply inside the mount. In this case you should be prepared to use a head loupe and fine tweezers to remove any remaining fluff from the cotton wool from the inner mount after cleaning. It is not an easy task to find the proper illumination to clean the backside lens, that is located deep in the objective mount. Using a corner of a kitchen tissue rolled together to a tip may provide a more efficient way to get the backside lens of a microscope objective cleaned.
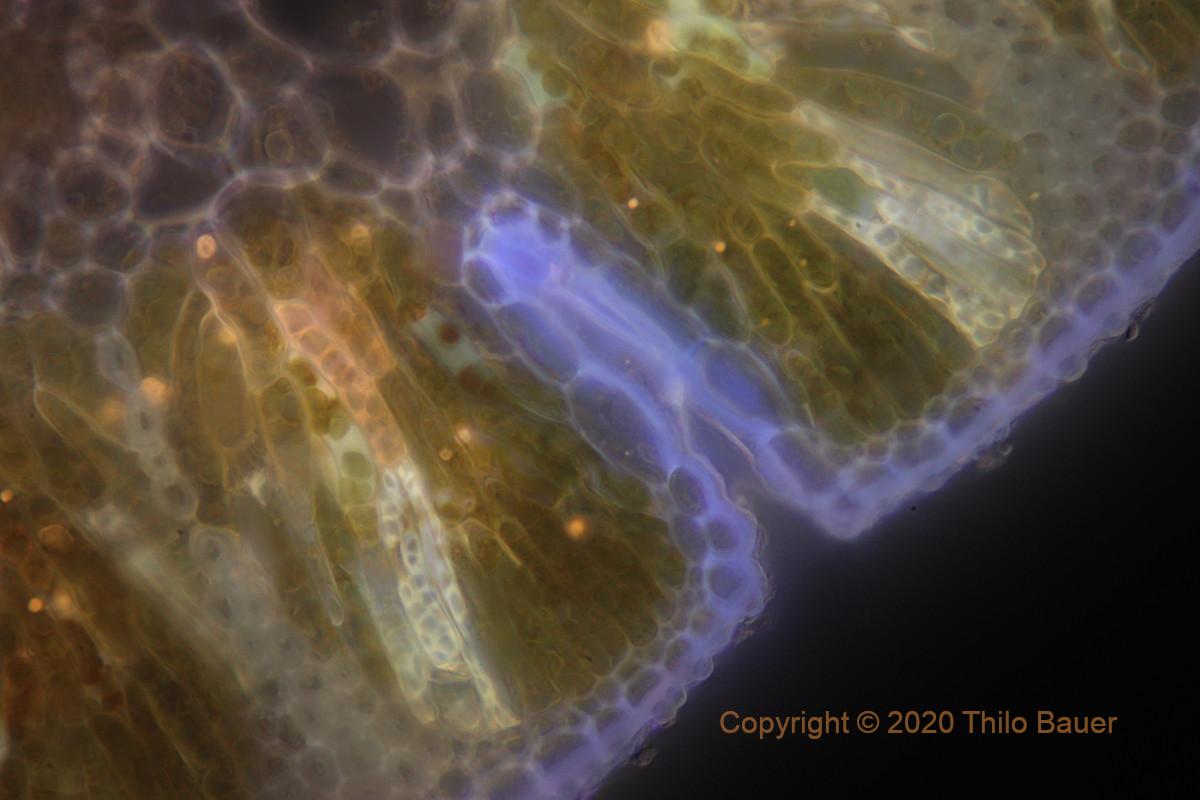
Figure: Casuarina sp., auto-fluorescence with UV excitation (385 nm) and water preparation. Detail image using a Zeiss LCI Plan-Neofluar 63x/1,3 Korr water immersion objective. A clean preparation and water immersion objectives support highest magnification resulting in brilliant images.
Conclusion
Well maintained and properly cleaned, a water immersion objective provides the best microscopic resolution and image quality with aqueous samples. This is based in Hartnack's simple idea to create a microscope optics that uses water for immersion. The cleaning method described in this article is tested over years and appears the most practical solution for daily microscopic observation. Typical pollution can be removed in a few twinkles of an eye.
Most often breathing onto the front lens and dry cleaning is enough. Finishing the observation with a water immersion objective always means a final cleaning step. Success of the cleaning procedure can be checked using higher magnifying glass and rotation test described above. Dried biofilms and other heavy pollutions can be removed either by using wet cleaning with detergents or the hard way using a "full washing program".
This articles is mainly meant to provide a guideline for personal use of a microscope. The method described here will not harm or damage water immersion objectives, because they are robust and known to require proper cleaning more often. Solutions used for the cleaning steps will not stay for long time on optical surfaces or bonding surfaces. From personal experience, so far, no defect on these objectives from extensive use and cleaning was found on any of my water immersion objectives. For the many different objectives from different manufactures, however, it is advised to check publications of the manufacturers, to find proper solvents to clean the objectives. Scientists shall rely on the local guidelines of their institutes, how to properly use and clean microscope optics.
Disclaimer
The author declares, to have read literature and thoroughly tested the methods described in this article over years. The author will not provide any warranty or take over responsibility for damage of any microscope optics by application of the methods described in this article. He will not refund damaged optics, be it properly handled according to these guidelines, or not, following the written procedure, application of the method or misinterpreting the descriptions in this article.
Literature
Zölffel, M. Das saubere Mikroskop. Carl Zeiss MicroImaging GmbH, Weblink.
Ockenga, W. How to Clean Microscope Optics. Leica Weblink.
Ogama, T. Mikroskop reinigen und sterilisieren. Olympus Weblink.